
In this blog, you will have the opportunity to delve into the intricacies of setting up a new project for D365 Implementation Services. This hands-on experience will guide you through the essential steps involved in project management, from creating detailed tasks to meticulously determining their durations. You will also learn the art of assigning responsibilities effectively, ensuring that each team member plays a crucial role in the project's success. Furthermore, you will explore the concept of establishing dependencies between tasks, understanding how one task can impact the timeline and progress of another. By the end of this session, you will have gained valuable insights into the strategic planning and execution required for a successful D365 implementation project.
Next, you will allocate both generic and named resources to your project plan, followed by creating and submitting resource requirements. You will identify and suggest resources for evaluation, then confirm and reserve them. Finally, you will import project estimates into the project agreement.
Task 1: Create a Project
When undertaking this task, it is essential to assume the role of the Admin Account to ensure all necessary permissions and access are available. By creating a new project specifically tailored for professional services related to D365 Implementation, you are embarking on a crucial step towards enhancing operational efficiency and maximizing the potential of the organization. This project holds significant importance as it directly impacts the successful implementation of D365, a powerful tool designed to streamline processes and optimize business functionalities.
1. Navigate to the Dynamics 365 - Project Operations page, go to the menu, choose Projects > Projects, and then click on + New Project.

On the New Project page, complete the settings below and click Save.
Setting | Perform the following |
Name | Type D365 Implementation services |
Customer | Select Anderson consulting firm |
Calendar template | Select Default Work Template |
Estimated Start Date | Click the calendar icon and select the date |


2. Go to the Tasks tab and select + Add new task

Note -- If you face any authentication issue on Tasks tab, then authenticate on (http://project.microsoft.com/) in a separate tab i.e. in the same browser session, open a new tab and navigate to (http://project.microsoft.com/). Sign in with your lab Microsoft 365 admin credentials. Once signed in successfully, go back to the Dynamics 365 - Project Operations page and refresh the page.
3. Add the following task names given below and then select Save.
0. Diagnostic
1. Project Kick Of
2. Stakeholder Identification
3. Key challenges identification
4. Detailed Project Plan
5. Communication Plan
6. Invite and Inform Stakeholders regarding Project
4. On the Project Kick Off task, select the more commands icon () and then select Make subtask.

5. Perform step 9 again for the tasks listed below:
0. Stakeholder Identification
1. Key challenges identification
2. Detailed Project Plan
3. Communication Plan
4. Invite and Inform Stakeholders regarding Project
6. The Grid view should look like this:

Add Task Dates and Duration
1. Click on the details icon for the Project Kick Off task.

2. On the Project kick-off panel, fill in the settings provided below and then select Close panel (X).
Setting | Perform the following |
Start | Select Monday this week |
Duration | Type 2d |
Finish | The finish date is automatically calculated |

3. Complete the remaining tasks with the following settings.
Task: Stakeholders identification | |
Setting | Perform the following |
Start | Select Monday this week |
Duration | Type 5d |
Task: Key challenges identification | |
Setting | Perform the following |
Start | Select Wednesday this week |
Duration | Type 5d |
Task: Detailed Project Plan | |
Start | Select Wednesday next week |
Duration | Type 3d |
Task: Deliver Blueprints | |
Setting | Perform the following |
Start | Select the 2nd Monday from this week |
Duration | Type 10d |
Task: Communication Plan | |
Setting | Perform the following |
Start | Select the 2nd Monday from this week |
Duration | Type 10d |
Task: Invite and inform stakeholders regarding project | |
Setting | Perform the following |
Start | Select the 3rd Monday from this week |
Duration | Type 10d |
|
|
4. Your Grid view should resemble the following:
NOTE: The summary task durations for your plan may be different in your plan, due to non-working days or statutory holidays in the default calendar template.
5. Click on Timeline and your display should resemble the following:

Add Task Dependencies
1. Click on the details icon for the Communication plan task.
2. On the Deliver Workshops pane, scroll down to the bottom and select Add dependency.
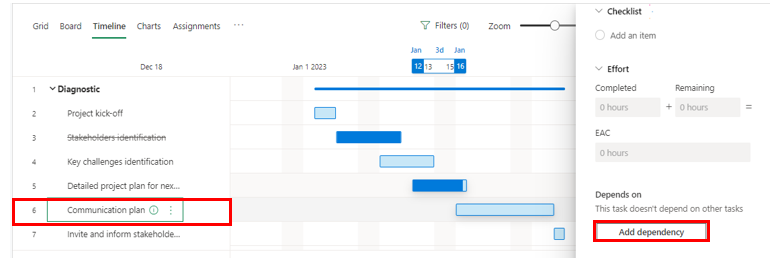
3. Select the 5 Detailed Project Plan task from the Suggested tasks list, and then close the Deliver Workshops pane.

4. Examine the Timeline view. Observe the connection between the Communication Plan and the Detailed project plan.

5. Right-click on the web browser tab and select Duplicate.
6. Open a new web browser tab, navigate to the change area menu, and select Sales.

Task 2: Add Project to ERP and CRM Implementation contract
1. In the navigation pane, go to the Sales section, click on project contracts, and choose ERP and CRM Implementation.

2. Choose D365 Implementation Services from the contract options.

3. Add the project under the name D365 Implementation Services

Task 3: Add Resources to Project Plan
For this assignment, you will be responsible for generating and allocating both generic and specifically named resources to the project plan.
Create and Assign Generic Resources
1. Go to the (Project) web browser tab and select the Grid view. Find the Project kick-off task in the Assigned to column, hover over it, and click on the icon to assign this task. Next, click on the ellipsis (...) and then choose Add generic resource.

2. On the Quick Create: Project Team Member pane, enter Project Manager in the Position Name field, update the role to Project Manager in the Role field, and finally, click on Save and Close.

3. The resource named Project Manager has been allocated to the Budget Planning task.

4. Repeat steps 1-3 for the generic resource named Consulting Lead who will have the role of Consulting Lead for the remaining tasks.

Task 4: Generate and Submit Resource Requirements
As the project manager, your responsibility is to derive resource requirements from the generic resources allocated to project tasks. After creating the requirements, your next step is to evaluate and send them to the resource manager for approval.
Generate Generic Resource Requirements
1. Click on the Team tab, switch the view to Generic Team Members, choose all generic resources, and finally, click on Generate Requirement.

2. Once the processing is finished, select OK.

Review and Submit Resource Requirements
1. Right-click on the tab of the web browser and select Duplicate.
2. From the new web browser tab, navigate to the change area menu on the navigation bar and select Resources.

3. In the navigation pane, go to the Resource section, select Requirements, then on the Active Resource Requirements page, click on D365 Implementation Services (Project) -- Consulting Lead.

4. Navigate to the Consulting Lead page and then click on Submit Request in the menu bar.

5. On the dialog box labeled Request Submitted, press the OK button.

6. Repeat steps 3-8 for PP1 Adventure Works Prof Services (Project) -- Project Manager
Task 6: Find, Propose and Mark Resources for Review
As a resource manager, your role in this task is to locate resources according to the Resource Requests submitted by the project manager. After identifying the resources, you will suggest and flag them for review to obtain approval from the project manager.
Find and Propose Resources
1. In the navigation pane, go to the Resources section, click on Requests, and then choose the Active Resource Requests page. Next, select the Project Manager role and click on Find Resources.

Clicking on this will launch the Schedule Board in a new tab of your web browser.
2. On the Schedule Board page, open the Filter View and examine the filter configurations.

3. Choose Abraham McCormick from the resource list, update the Booking Status to Proposed, and then click Book & Exit. (Wait for the notification message and the web browser tab will close automatically.)

4. Follow the same procedure as steps 1-3 for the request of the Consulting Lead, choose a resource that is free, update the Booking Status to Proposed and finally click on Book & Exit.
Mark Resources for Review
1. To refresh the page on the Active Resource Requests page, simply press F5.
Observe that the status has changed to In Progress.
2. Choose the role request for the Project Manager and then select Edit.

3. Click on Mark for Review followed by clicking Save & Close on the Resource Request page.
4. Repeat steps 2-3 with the role of Consulting Lead.
5. Press F5 on the Active Resource Requests page to refresh the page.
Take note that the status has been updated to Needs Review.

This concludes "Project Execution and Resource Management" functionalities of D365 Project Ops. Let's deep dive on "Managing Project Timesheet and Expenses" Functionality - https://www.learningd365.blog/post/lab-5-time-management-and-expense-processing-activities
Comments