
Managing Time and Expense Processing Activities
- sribatsapatra1
- Jul 16, 2024
- 3 min read
Updated: Jan 9
Overview
In this lab, you will engage in a comprehensive set of activities designed to simulate real-world time and expense management scenarios. By participating in these tasks, you will gain practical experience in handling diverse situations that professionals encounter in their day-to-day work. The exercises are carefully crafted to mirror the challenges faced by different users, offering you a nuanced perspective on the complexities involved in managing time and expenses effectively.
Task 1: Assign Project Approvers
For this assignment, you are required to designate Admin Account and Abraham McCormick as Project Approvers who will be responsible for approving all time or expense entries that are submitted.
1. Go to the (Project) web browser tab, navigate to the Team tab, choose Abraham McCormick, click on the more commands icon, and then select Edit.

2. On the Project Team Member page, select Yes in the Project Approver box, and then click Save & Close.

Task 2: Time Entries
This task involves creating and submitting time entries.
Create Time Entry
1. Navigate to the Time Entries option under My Work section. Then, on the My Weekly Time Entries page, select + New.

2. Fill in the fields on the Quick Create: Time Entry panel, then click the downward arrow (V) and choose Save & Create New.
Setting | Perform the following |
Date | Click calendar icon and select Monday this week. |
Duration | Select 8 hours |
Type | Select Work |
Project | Click search icon and select D365 Implementation Services |
Project Task | Click search icon and select Project Kick-Off |

3. Repeat step 6 a total of four times, increasing the date by 1 day each time.
4. Press F5 on the My Weekly Time Entries page to refresh it, then choose the row and click on Submit.
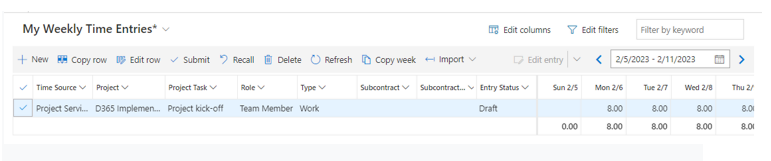
Once the processing is complete, observe that the Entry Status has been updated to Submitted.
Approve Time Entry
As the Admin Account (Project Manager) in this assignment, your responsibility is to review and approve time entries.
1. Go to the (Project) web browser tab and navigate to the My Work section. Click on Approvals.

2. On the Time Entries for Approval page, make sure to choose all the entries, then proceed by clicking Approve, and finally confirm by clicking OK in the dialog box.

Task 2: Expense Entries
For the D365 Implementation Services project, your responsibility is to generate and send travel expense reports.
Create Expense Entry
1. Navigate to the Expenses section under My Work. Once on the My Expenses page, select + New.

2. On the Quick Create: Expenses panel, fill in the following settings and then press Save and Close.
Setting | Perform the following |
Transaction Date | Click calendar icon and select today's date. |
Project | Click search icon and select D365 Implementation Services |
Project Task | Click search icon and select Project Kick-off |
Expense Purpose | Type Travel Expenses |
Expense Category | Select Flight |
Sales tax amount | Type 40 |

3. Choose the row on the My Expenses page and then press Submit.

Once the processing is completed, observe that the Expense Status has been updated to Submitted.
Change to the Admin Account browser
Approve Expense Entry
Your responsibility in this assignment is to assess and authorize time entries.
1. Access the Approval tab under My Work and switch the view to Expense Entries for Approval.
2. On the Expense Entries for Approval page, choose the entry, click Approve, and then select OK in the dialog box.

This concludes "Managing Project Timesheet and Expenses" functionalities of D365 Project Ops. Let's deep dive on "Managing Project Timesheet and Expenses" Functionality - https://www.learningd365.blog/post/invoicing-and-accounting-activities
Comments