
Task 1: Invoicing
In this task, you are playing the role of Admin Account (Project Manager) that will be reviewing the billing backlog for Time and Material. You will then select entries in the billing backlogs and create project invoices. Afterwards, you will complete the same actions for Fixed Price Milestones.
As the Admin Account and Project Manager, it is crucial to meticulously review the billing backlog for Time and Material to ensure accuracy and completeness. This process involves carefully examining each entry, verifying the corresponding project activities, and cross-referencing the billed hours or materials used. By conducting a thorough review, you can identify any discrepancies or inconsistencies that may require further investigation or clarification. Once the billing backlog has been meticulously reviewed, the next step is to select the appropriate entries for invoicing. This task involves a keen understanding of project timelines, milestones, and deliverables to accurately reflect the work completed. Creating project invoices requires attention to detail, as each invoice should clearly outline the services rendered, associated costs, and any relevant terms or conditions. After completing the billing process for Time and Material, the same level of precision and diligence must be applied to Fixed Price Milestones. This involves reviewing project milestones, assessing progress against predetermined targets, and ensuring that invoicing aligns with the agreed-upon terms. By carefully navigating through the Fixed Price Milestones, you can effectively generate accurate invoices that reflect the project's progress and milestones achieved. In summary, as the Admin Account and Project Manager overseeing the billing backlog for Time and Material, as well as Fixed Price Milestones, your role is pivotal in maintaining financial transparency, ensuring billing accuracy, and facilitating smooth invoicing processes for the projects under your purview. By adhering to best practices and attention to detail, you can contribute to the overall success and financial health of the projects you manage.
Create Time and Material Invoice
1. Go to the (Sales) web browser tab, then navigate to the Billing section in the menu and select Time and Material billing backlog.
2. Go to the Time and Material billing backlog page, choose all the items, and then click on Ready to invoice.

3. Navigate to the Sales section and select Project Contracts.
4. Navigate to the My Project Contracts page, locate the ERP and CRM Implementation contract, and proceed to click on Create Project Invoices.

5. In the message dialog box, examine the message content and then press OK.

6. Press OK in the dialog box.
Modify Time and Material Invoice
You must adjust the duration for which a resource was involved in a project task before sending the invoice to the customer.
1. Access the Invoices section by selecting it from the navigation menu under the Billing category.
2. On the Project Service Invoices page, select ERP and CRM Implementation Services
3. On the page, navigate to the Project-based Lines section, choose D365 Implementation Services, and then click on Edit.

4. On the Professional Services page, choose the latest Time entry and then click on Edit.

5. Modify the Quantity on the New Invoice Line Detail page, then proceed to click Save & Close.
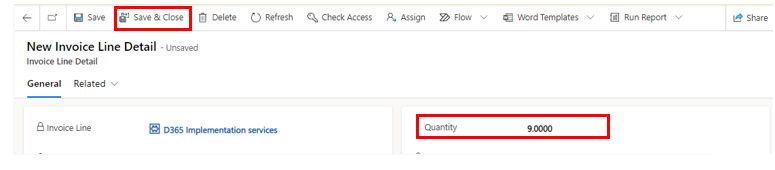
6. On the D365 Implementation services page, examine the transactions, then click Save & Close when you have completed the review.

7. On the Invoice page, scroll to the bottom and observe that the Detail Amount has been altered.
8. Once you have completed the review of the draft project invoice, click on the Confirm button in the menu bar.
Invoice
1. Navigate to the (Sales) web browser tab, then go to the Billing section in the navigation menu, and click on Time and Material billing backlog.

2. After the processing is completed, observe that the status of the Project Invoice has been updated to Confirmed.

Create Time and Material Invoice
1. Go to the (Sales) tab in the web browser, then navigate to the Project Contract in the menu and choose the AMS Contract line in the Invoice Schedule section.

2. Choose a milestone and Modify

3. Update the status of the Invoice to Ready for Invoicing

4. Go to the My Project Contracts page, choose the ERP and CRM Implementation contract, and click on Create Project Invoices.

Final Invoicing
The legal entity needs to be changed to USPM.
To access the Import from staging table option, navigate through the menu as follows: Modules -> Project Management and Accounting -> Periodic -> Project Operations Integration.

2. Click on the button labeled Recurrence.
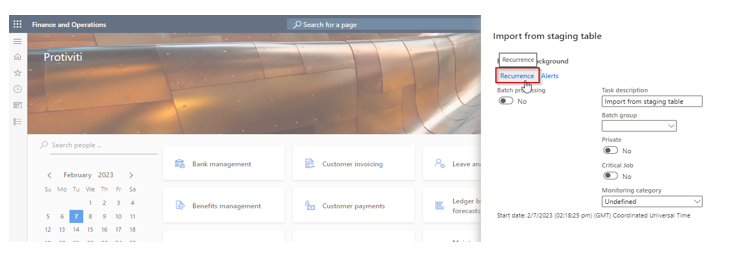
3. Configure the recurrence to be set as endless and repeating every minute (please adjust this based on actual business requirements and transaction volumes).

Select OK.
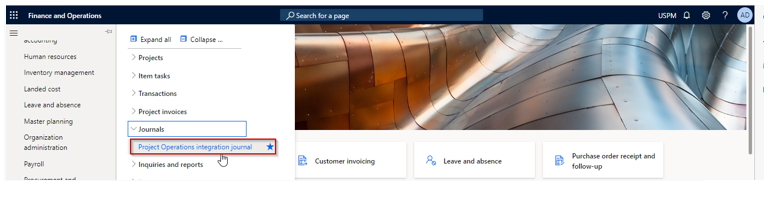
Next go to Project Management and Accounting > Journals >Project Operations integration journal.
Once you locate the draft journal, choose it and then click the Lines button.
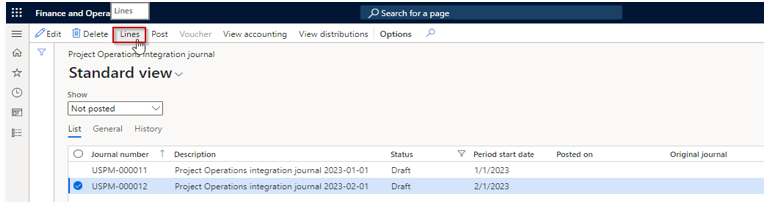
7. Examine the lines. If the Billing sales tax group was not configured in the Project during the prerequisite steps, you will see that it is empty.

8. To update the lines with values in this column, simply click on Edit and make the necessary modifications in the grid.

After closing the form, click the Post button to submit the transactions. Confirm the dialog that appears. Upon successful completion of the transaction, you will see a blue confirmation bar at the top of the screen.

Go to Project Management and Accounting > Project Invoices > Project Invoice Proposals.

11. Locate the invoice that was generated in the previous activity.

Click the hyperlink for Invoice proposal to view the details.

13. Choose Print. Then, select Format invoice proposal.

14. To start a new line, click on the New button. Choose Summary for the line type and enter the line description under Type. Navigate to the Include transactions tab, check all the transactions, and click on the Include transactions button.

15. The screen below will be visible.

16. To go back to the Invoice proposal, close this window. Click on Post. In the slider, switch Print invoice to true and then click confirm.

Revenue Recognition
Go to Project Management and accounting. Select Projects, then choose Fixed – price revenue estimate projects. Observe that a revenue estimate project has been created.

To begin, choose the revenue estimate project and access Estimates by clicking on the Revenue Recognition button.

Click on New to generate a new estimate. In the slider, select a Revenue recognition date (ensure it is after the transaction dates from the previous steps), specify the Cost to complete, set the completion percentage to Manual, and then click OK.

Check the calculation result.

It is possible to manually adjust the Accrued Revenue – Sales value before posting in the Profit and Loss tab, or adjust the WIP – Sales value Estimate in the WIP tab.


Record the calculation result in the ledger.

コメント